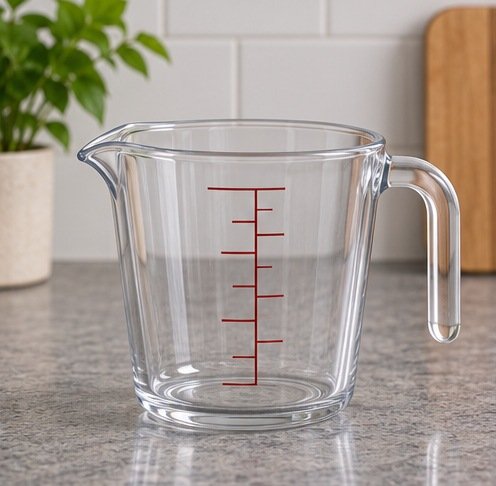
Choose a measuring jug with clear markings around the quantities you measure most often and a spout you can control. A small jug is more useful for modest amounts when a large one has widely spaced marks. A bigger size helps when you prepare larger batches or need room to stir. Decide what liquids go into it and check the recommended use and temperature limits, especially if you intend to heat or pour warm ingredients.
Start with the range in the recipes you use
Write down five values from recipes that send you to the jug, including the smallest amount and the most common large amount. Compare their units and how they are written. A cup, a fraction of a cup, and a number of milliliters should be readable without assumptions about the scale. If a small marking sits near a curved portion of the base, check that it is clearly interpretable. A single tall jug can cover a broad range while being difficult to use for quantities barely visible above the bottom.
Consider what you do after measuring. If you whisk or transfer ingredients in the same vessel, allow working space above the amount. A jug rated to hold a stated maximum may be awkward to move when filled to that point. For a very small amount, use a tool and technique appropriate for that measurement. For a larger recipe, compare how many refills you actually need. Two small steps can work for occasional use, while one larger vessel may simplify a repeat batch when it is practical to lift.
Check the scale in the position you use
Conventional side markings should be read with the jug on a level surface and your view appropriately aligned with the correct level. Avoid estimating while holding the jug tilted. An angled scale can be designed for reading from above. OXO's angled cup illustrates this display approach. If you like such a format, follow that model's instructions and check whether all the values you need appear on that face. Color and contrast can matter more than extra labeling in poor kitchen light.
Look at the scales separately. Some jugs show several units with different spacing. Confirm that a dark liquid or residue does not hide either the numbers or the line representing the chosen amount. Compare how you can read them with the handle on your preferred side. If you switch between metric and cups, make sure you are looking at the scale the recipe expects. Familiar symbols or a visible difference between the sets of markings can help. If you only use one unit system, a less cluttered scale may be easier to read.
Compare material and supported use
Clear plastic can be light and easy to handle. Check any restrictions for heat and cleaning, and assess whether the scale remains easy to read once the surface picks up normal wear. Glass can give another feel and different handling, including more weight when full. Look up the exact temperature and appliance-use guidance instead of drawing conclusions from appearance. Manufacturer instructions may address changes in temperature, mixing, or which surfaces make suitable contact.
Think about where you place the jug. A flat, suitable surface is necessary for consistent use. A heavy jug with a broad base may stay steadier in ordinary handling, but the overall weight matters if you pour a full amount with one hand. A light model may make it easier to move from the sink to the counter. If the jug usually sits beside several hot items, pick a position protected from unintended contact and follow the handling instructions for the liquids you use. Consider this layout before choosing the largest capacity.
Inspect the handle and spout as a pair
Try the pouring angle using a similar container. A large loop can let you reposition your hand, whereas a straight grip can be convenient in a crowded cupboard. Check clearance with the amount of liquid you usually move. A jug for adding water to a small opening benefits from a spout with controllable flow. A wide lip can work for pouring into a large bowl. Read what the maker says about holding the body or handle with warm ingredients.
Look at any features that change where the liquid comes out. A molded corner may need a steeper angle to pour the last portion. Some layouts keep the spout opposite the strongest grip you use, while others work differently with a left-handed hold. See if you can rinse around the spout easily and whether it protrudes into neighboring shelves. A spoon rest or lid can help with a specific use, but those pieces add to cleaning and storage. Choose a lid only if it is approved for your intended task.
Rehearse an ordinary recipe and cleanup
Measure one low quantity and one comfortable full working amount. Use supported conditions and notice whether the marks are readable, the jug remains stable, and you can get the liquid into the intended bowl without turning around a lot. Repeat the small measurement after a wash to see how fast you can get set up. If the line is constantly hard to view, compare where you stand and whether another display gives a better view.
Check how the jug nests or hangs. Some have embossed markings while others use a printed scale. Follow the care instructions for the measurement surface. Markings only add value while they remain readable, so replace or reconsider a damaged jug when you can no longer identify the required values. Keep the jug close to the tools used in the same recipes. For a busy kitchen, a smaller everyday jug and a larger one for mixing can each earn their space if the quantities are genuinely different.
Decide when to use a scale instead
If a recipe gives an ingredient by weight and you can weigh it appropriately, use the specified measurement rather than estimating a volume conversion. A jug remains valuable for measuring volume or pouring from an accessible container. Check what the recipe assumes and distinguish the two when writing your own notes. If you use a jug on a supported scale, include its weight in the capacity and follow the scale's setup. This can streamline prep without making a large jug necessary for ingredients that are usually used in small amounts.
Compare repeated small pours
Try putting a small amount of cool water in a sample jug and pouring it into the narrowest vessel you regularly use. Notice whether you can stop the stream without leaving drips outside the vessel and whether the grip shifts as you tilt. A person with a different grip may prefer another handle even when the spout works well. Keep the pouring surface separate from the place where you read the measurement if necessary; checking on one stable surface and pouring from another can make the process more repeatable.
Related guide: Read the companion buying guide.
Reference: See the source and specifications.
Frequently asked questions
Is a larger jug more accurate?
Accuracy depends on the instrument, the scale, the quantity and how you read it. Small values often benefit from an appropriately sized device.
Can I heat liquid directly in the jug?
Use only the appliances and conditions supported by its maker. Appearance alone does not establish suitability for heat.
Are angled markings required?
A conventional scale can work well when read correctly. Compare which type gives you a clearer view in your kitchen.